学习来源:SSM主流框架入门与综合项目实战
拥抱Spring第一步:掌握Bean的使用
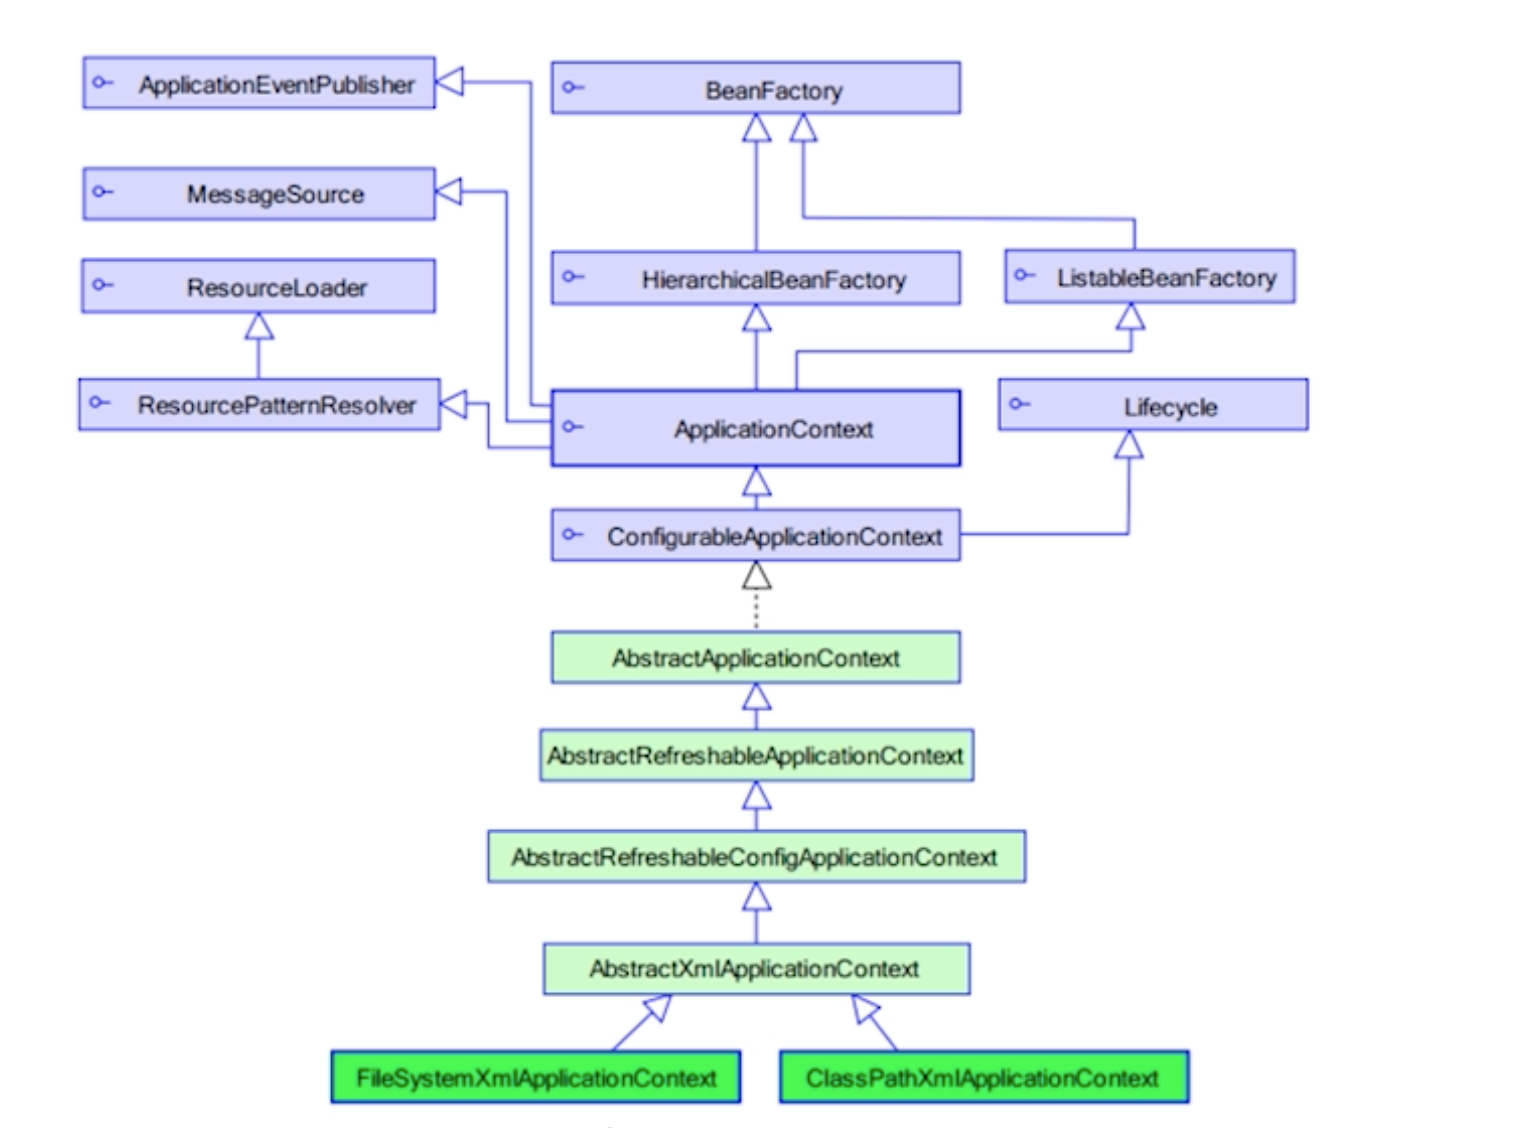
Spring初览

开发准备
需要使用到众多Spring的jar包,包括
- spring-core
- spring-context
- spring-beans
- spring-expression
- spring-aop
保持这些包的版本的一致性,我用的是v4.2.2.RELEASE版本
同时需要使用到log4j进行日志输出,不过不是必须的
需要使用到junit进行测试,使用4.x版本最好,我使用的是4.11
其次,项目的目录如下,使用maven的web-app模板创建
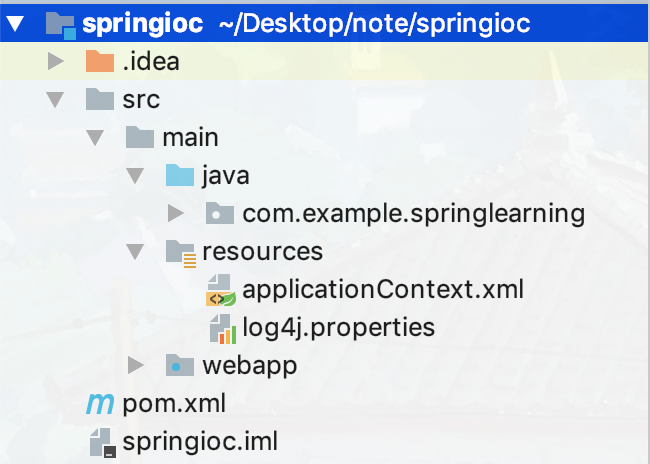
- java 用于存放源码
- resources 用于存放一些配置文件
- webapp 用于存放jsp已经一些和前端有关的配置,当然还有WEB-INF
通过配置文件操作Bean
存放在 resources目录下的applicationContext.xml文件用于对Spring进行相关配置,大体框架如下
1
2
3
4
5
6
| <?xml version="1.0" encoding="UTF-8"?>
<beans xmlns="http://www.springframework.org/schema/beans"
xmlns:xsi="http://www.w3.org/2001/XMLSchema-instance"
xsi:schemaLocation="http://www.springframework.org/schema/beans http://www.springframework.org/schema/beans/spring-beans.xsd">
</beans>
|
第一个控制反转和依赖注入
控制反转就是将对类初始化等操作的控制权交给Spring,这就意味着不同写new关键词了依赖注入就是将对javabean的赋值setter操作用编写配置文件代替,也就是将setter,getter方法的使用交给Spring完成
编写接口 UserService,模拟服务层接口
1
2
3
| package com.example.springlearning.ioc.demo1;
public interface UserService {
void sayHello();
|
在编写其实现类 UserServiceImpl,设置一个私有属性 name ,以及它的setter和getter方法,toString方法,这些方法这里就不再列出了,占空间
1
2
3
4
5
| package com.example.springlearning.ioc.demo1;
public class UserServiceImpl implements UserService{
private String name;
}
|
此时,填写配置文件 applicationContext.xml,将实现类的信息填入,并填写初始化信息(此为依赖注入)
1
2
3
4
5
6
| <beans .....>
<bean id="userService" class="com.example.springlearning.ioc.demo1.UserServiceImpl">
<!-- 依赖注入:在xml中配值 -->
<property name="name" value="依赖注入"/>
</bean>
</bean>
|
属性id必须唯一,和HTML中的id一样,作为其标签的唯一标示,而class是交给Spring控制的类引用路径,里面的标签就是对这个类的属性进行赋值的;这样,一旦Spring容器启动,就会初始化配置文件中的类,同时根据配置的值为其属性赋值;再编写一个测试类
1
2
3
4
5
6
7
8
9
| package com.example.springlearning.ioc.demo1;
public class UserServiceImplTest {
@Test
public void sayHello() {
ApplicationContext context = new ClassPathXmlApplicationContext("applicationContext.xml");
UserService userService = (UserService)context.getBean("userService");
userService.sayHello();
}
}
|
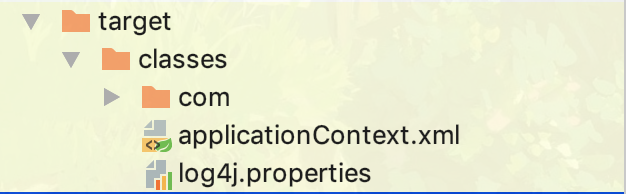
ClassPathXmlApplicationContext 会启动Spring,读取配置文件,初始化配置文件中的类,产生全局唯一的Context,那官方的话说,就和Servlet中的Context一样,为一个单例。填入其中的其实是一个相对路径,这是相对classPath的,位于classPath的根目录底下,为什么,看一看编译好的文件结构,如下图,就在classes文件夹下
同样是读入配置文件,也可以使用 FileSystemXmlApplicationContext读取,但是需要填写相对于你的project根目录的路径,如下
1
| ApplicationContext context = new FileSystemXmlApplicationContext("src/main/resources/applicationContext.xml");
|
当然,填写绝对路径也行,不过要在要在最前面再加一个 ‘/‘,原因如下
首先,在MacOS和Linux下绝对路径应该这么写 “/Uses/…/…./..”,但是这样是报错的,查看FileSystemXmlApplicationContext的解析路径的方法getResourceByPath
源码发现它默认读取的是相对路径,所有只要路径不为空,它就会把第一个 ‘/‘ 去掉,如果你真的要写绝对路径,那么应该在路径前再加一个斜杠,这么写 “//Users/../../“,这样子它处理的时候只把第一个斜杠去掉了,剩下来的就是绝对路径

或者写相对路径也可以,也是源码推荐的方式,你可以写相对于存放源码的文件夹的路径,如果你的工程目录如下
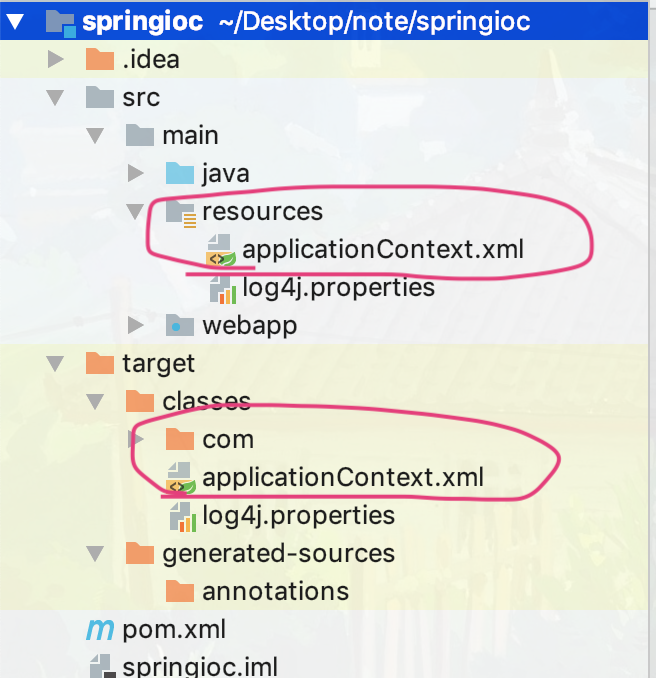
相对于java虚拟机执行字节码时所在的路径,使用IDE的话执行时是在项目的根目录,所以应该是相对于项目的根目录,为 src/main/resources/applicationContext.xml;但是由于生成了编译好的target目录,里面也有applicationContext.xml,所有你填写target/classes/applicationContext.xml 也可以运行起来
初始化bean的三种方式
类构造器
第一种就是直接使用bean标签对其进行初始化
1
2
3
4
5
6
| package com.example.springlearning.ioc.demo2.Bean1;
public class Bean1 {
Bean1() {
System.out.println("构造一:类构造器");
}
}
|
在配置文件中这样写,这是最常见的配置方式
1
2
3
| <beans .....>
<bean id="createBean1" class="com.example.springlearning.ioc.demo2.Bean1"/>
</beans>
|
静态工厂创建
再建立一个bean
1
2
3
4
5
6
| package com.example.springlearning.ioc.demo2.Bean2;
public class Bean2 {
Bean2() {
System.out.println("构造二:静态工厂方式");
}
}
|
再新建一个工厂类,使用静态方法实例化上面的那个bean
1
2
3
4
5
6
7
| package com.example.springlearning.ioc.demo2.Bean2Factory;
public class Bean2Factory {
public static Bean2 createBean2() {
System.out.println("构造二:静态工厂方式,工厂创建");
return new Bean2();
}
}
|
在xml文件中配置bean工厂,以及生成bean的方法就行了
1
2
3
| <beans ...>
<bean id="createBean2" class="com.example.springlearning.ioc.demo2.Bean2Factory" factory-method="createBean2"/>
</beans>
|
实例工厂
这个方法和上面的区别就是工厂类中生成bean的方法不是静态的,所以在配合文件中两个bean都需要声明
1
2
3
4
| <beans ...>
<bean id="createBean3" class="com.example.springlearning.ioc.demo2.Bean3Factory"/>
<bean id="createBean3Instance" factory-bean="createBean3" factory-method="createBean3"/>
</beans>
|
调用时使用第二个bean的id
Bean的作用域
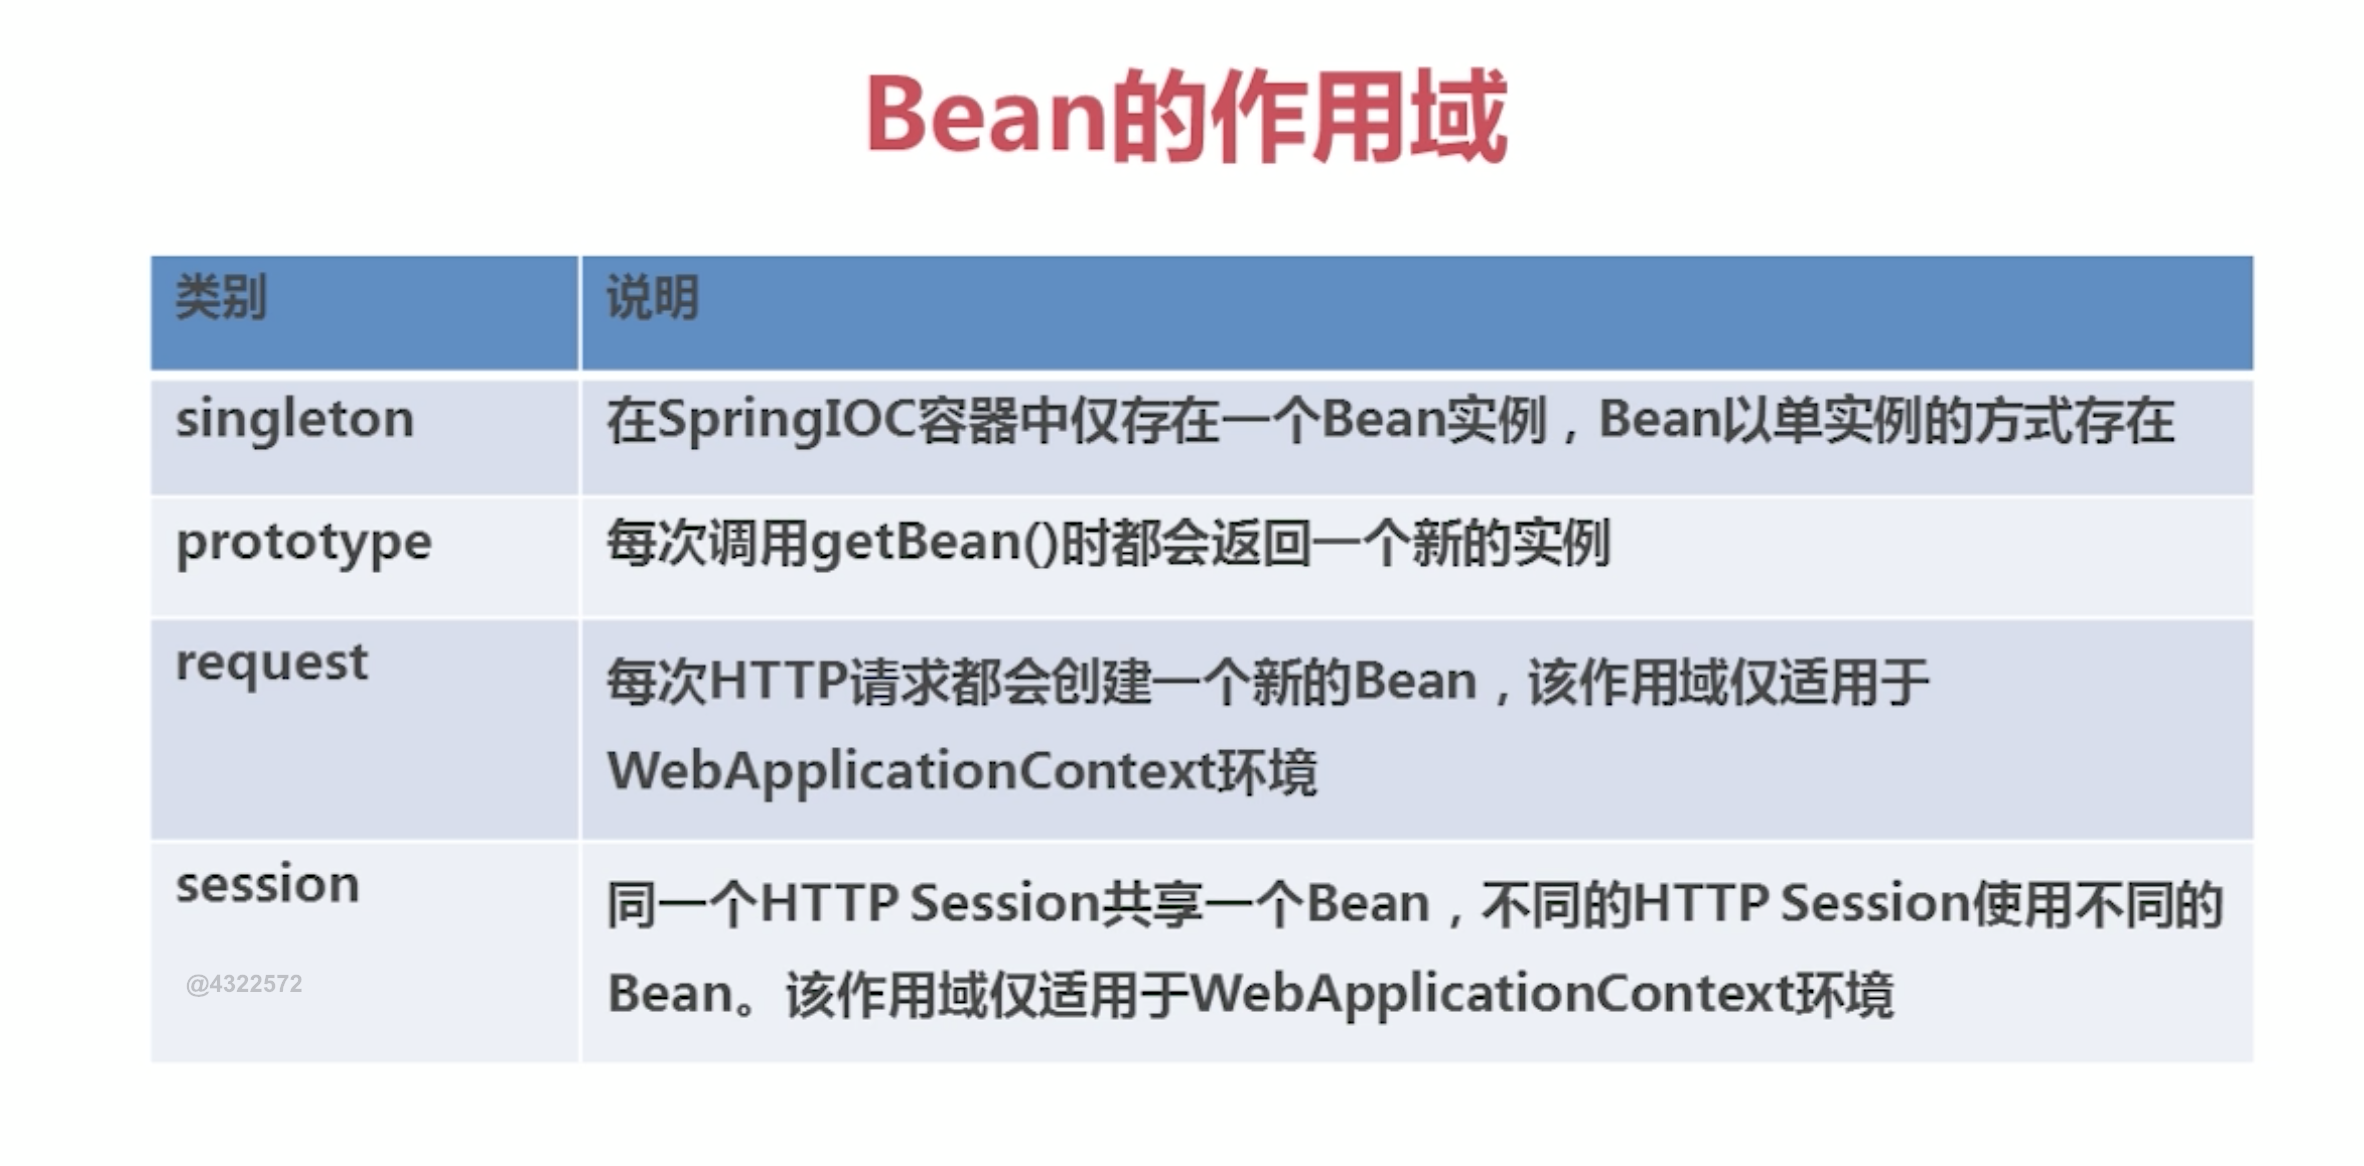
默认是单例,可以在bean配置文件中用scope配置
Bean的生命周期
bean有11个hook可以为开发者所用,向其中注入代码
1
2
3
4
5
6
7
8
9
10
11
12
13
14
15
16
17
18
19
20
21
22
23
24
25
26
27
28
29
30
31
32
33
34
35
36
37
38
39
40
41
42
43
44
45
| public class BeanLifeCycle implements BeanNameAware, ApplicationContextAware, InitializingBean, DisposableBean {
private String name;
public BeanLifeCycle() {
System.out.println("第一步:初始化...");
}
public void setName(String name) {
System.out.println("第二步:设置属性");
this.name = name;
}
@Override
public void setBeanName(String name) {
System.out.println("第三步:设置Bean的名称" + name);
}
@Override
public void setApplicationContext(ApplicationContext applicationContext) throws BeansException {
System.out.println("第四步:了解工厂信息");
}
@Override
public void afterPropertiesSet() throws Exception {
System.out.println("第六步:属性设置后");
}
public void setup(){
System.out.println("第七步:BeanLifeCycle被初始化了...");
}
public void run(){
System.out.println("第九步:执行业务方法");
}
@Override
public void destroy() throws Exception {
System.out.println("第十步:执行Spring的销毁方法");
}
public void teardown(){
System.out.println("第十一步:MAN被销毁了...");
}
}
|
还有两个是在额外的类中配置
1
2
3
4
5
6
7
8
9
10
11
12
13
| public class BeanLifeCyclePostProcessor implements BeanPostProcessor{
@Override
public Object postProcessBeforeInitialization(Object bean, String beanName) throws BeansException {
System.out.println("第五步:初始化前方法...");
return bean;
}
@Override
public Object postProcessAfterInitialization(Object bean, String beanName) throws BeansException {
System.out.println("第八步:初始化后方法...");
return bean;
}
}
|
xml文件配置如下
1
2
3
4
5
6
7
8
| <beans ...>
<bean id="beanLifeCycle" class="com.example.springlearning.ioc.demo3.BeanLifeCycle"
init-method="setup"
destroy-method="teardown">
<property name="name" value="beanLifeCycle"/>
</bean>
<bean class="com.example.springlearning.ioc.demo3.BeanLifeCyclePostProcessor"/>
</beans>
|
编写测试类
1
2
3
4
5
6
7
8
9
10
11
| public class BeanLIftCycleTest {
@Test
public void lifeCycleTest() {
ClassPathXmlApplicationContext applicationContext = new ClassPathXmlApplicationContext("applicationContext.xml");
BeanLifeCycle beanLifeCycle = (BeanLifeCycle)applicationContext.getBean("beanLifeCycle");
beanLifeCycle.run();
applicationContext.close();
}
}
|
输出如下
1
2
3
4
5
6
7
8
9
10
11
12
13
| 第一步:初始化...
第二步:设置属性
第三步:设置Bean的名称beanLifeCycle
第四步:了解工厂信息
第五步:初始化前方法...
第六步:属性设置后
第七步:BeanLifeCycle被初始化了...
第八步:初始化后方法...
// 执行 beanLifeCycle.run() 方法
第九步:执行业务方法
// 执行 applicationContext.close();
第十步:执行Spring的销毁方法
第十一步:MAN被销毁了...
|
利用生命周期的hook增强bean方法功能
理由上面的第八步,可以对要执行的方法使用动态代理嵌入一些代码
原始的bean如下
1
2
3
4
5
6
7
8
9
10
11
| public class UserDaoImpl implements UserDao{
@Override
public void query() {
System.out.println("进行query");
}
@Override
public void delete() {
System.out.println("进行delete");
}
}
|
利用 BeanPostProcessor 接口提供的方法在bean方法初始化之后,方法调用之前对部分函数嵌入代码
1
2
3
4
5
6
7
8
9
10
11
12
13
14
15
16
17
18
19
20
21
22
23
24
25
26
27
28
| public class UserDaoImplEnhance implements BeanPostProcessor{
@Override
public Object postProcessBeforeInitialization(Object bean, String beanName) throws BeansException {
return bean;
}
@Override
public Object postProcessAfterInitialization(final Object bean, String beanName) throws BeansException {
if ("demo4UserDaoImpl".equals(beanName)) {
return Proxy.newProxyInstance(
bean.getClass().getClassLoader(),
bean.getClass().getInterfaces(),
new InvocationHandler() {
@Override
public Object invoke(Object proxy1, Method method, Object[] args) throws Throwable {
if ("query".equals(method.getName())) {
System.out.println("查询代理增强");
}
return method.invoke(bean, args);
}
});
}
return bean;
}
}
|
query方法执行结果如下
对复杂对象的注入
对于 Array,Map,List,Set,Property这样的复杂对象属性,xml配置文件也有相应的标签对其进行属性值的注入,如下
1
2
3
4
5
6
7
8
9
10
11
12
13
14
15
16
17
18
19
20
21
22
23
24
25
26
27
28
29
30
31
32
33
34
35
|
<property name="arr">
<list>
<value>aaaa</value>
<value>aaaa</value>
</list>
</property>
<property name="list">
<list>
<value>bbbbbb</value>
<value>bbbbbb</value>
</list>
</property>
<property name="map">
<map>
<entry key="aaa" value="1"/>
<entry key="ccc" value="3"/>
</map>
</property>
<property name="set">
<set>
<value>aaaa</value>
<value>bbbbbb</value>
</set>
</property>
<property name="properties">
<props>
<prop key="aaa">111</prop>
<prop key="ccc">333</prop>
</props>
</property>
|
使用ref标签和spel语句对配置文件进行设置
如果bean存在有参构造函数可以通过 constructor-arg 标签进行中注入
1
2
3
4
| <bean id="demo5Bean1" class="com.example.springlearning.ioc.demo5.Bean1">
<constructor-arg name="name" value="demo5bean1"/>
<constructor-arg name="age" value="12"/>
</bean>
|
如果一个Bean中包含另一个Bean可以使用如下的方式注入
1
2
3
4
5
6
| <bean id="demo5Bean21" class="com.example.springlearning.ioc.demo5.Bean21">
<property name="bean22" ref="demo5Bean22"/>
</bean>
<bean id="demo5Bean22" class="com.example.springlearning.ioc.demo5.Bean22">
<property name="name" value="demo5Bean22"/>
</bean>
|
- 使用spel表达式,同时也可以调用bean中的方法
1
2
3
4
5
6
7
| <bean id="demo5Bean31" class="com.example.springlearning.ioc.demo5.Bean31">
<property name="bean32" value="#{demo5Bean32}"/>
<property name="data" value="#{demo5Bean32.fetchData()}"/>
</bean>
<bean id="demo5Bean32" class="com.example.springlearning.ioc.demo5.Bean32">
<property name="data" value="#{200.0}"/>
</bean>
|
但是注意,如果调用另一个bean中的getter方法希望获取初始化后的值是不行的,因为经过测试对getter方法的调用在对那个bean初始化之前
使用注解方式对bean进行配置
首先要修改配置文件如下
1
2
3
4
5
6
7
8
9
10
| <?xml version="1.0" encoding="UTF-8"?>
<beans xmlns="http://www.springframework.org/schema/beans"
xmlns:xsi="http://www.w3.org/2001/XMLSchema-instance"
xmlns:context="http://www.springframework.org/schema/context" xsi:schemaLocation="
http://www.springframework.org/schema/beans http://www.springframework.org/schema/beans/spring-beans.xsd
http://www.springframework.org/schema/context http://www.springframework.org/schema/context/spring-context.xsd">
<context:component-scan base-package="com.example.aop.demo1"/>
<context:component-scan base-package="com.example.aop.demo2"/>
</beans>
|
context:component-scan 是告诉SPring要在那些包中扫描bean相关注解
第一个注解
1
2
3
4
5
6
| @Service("userService")
public class UserService {
public String sayHello(String name) {
return "Hello " + name;
}
}
|
在测试类中调用时输入 userService 作为id就行了
1
2
3
4
5
6
7
8
| public class UserServiceTest {
@Test
public void sayHello() {
ApplicationContext context = new ClassPathXmlApplicationContext("applicationContext.xml");
UserService userService = (UserService)context.getBean("userService");
System.out.println(userService.sayHello("nzy"));
}
}
|
模拟web开发
先建立dao层
1
2
3
4
5
6
7
| @Repository("userDao")
public class UserDao {
public String queryData() {
System.out.println("执行dao操作");
return "data";
}
}
|
再建立service层,Resource和上面的两个注解加起来等价,注意dao命名保持一致
1
2
3
4
5
6
7
8
9
10
11
12
13
| @Service("userService")
public class UserService {
@Resource
private UserDao userDao;
public String queryData() {
System.out.println("执行service操作");
return this.userDao.queryData();
}
}
|
测试
1
2
3
4
5
6
7
8
| public class UserServiceTest {
@Test
public void queryData() {
ApplicationContext context = new ClassPathXmlApplicationContext("applicationContext.xml");
UserService userService = (UserService)context.getBean("userService");
System.out.println(userService.queryData());
}
}
|
配置文件与注解配合使用
使用配置文件声明bean,使用注解进行别的一些操作
1
2
3
4
5
6
7
8
9
10
11
12
13
14
| <beans>
<?xml version="1.0" encoding="UTF-8"?>
<beans xmlns="http://www.springframework.org/schema/beans"
xmlns:xsi="http://www.w3.org/2001/XMLSchema-instance"
xmlns:context="http://www.springframework.org/schema/context" xsi:schemaLocation="
http://www.springframework.org/schema/beans http://www.springframework.org/schema/beans/spring-beans.xsd
http://www.springframework.org/schema/context http://www.springframework.org/schema/context/spring-context.xsd">
<context:annotation-config/>
<bean id="userService" class="com.example.aop.demo3.UserService"/>
<bean id="msgDao" class="com.example.aop.demo3.MsgDao"/>
<bean id="contentDao" class="com.example.aop.demo3.ContentDao"/>
</beans>
</beans>
|
这是编写两个dao层
1
2
3
4
5
| public class ContentDao {
public void insetData() {
System.out.println("ContentDao:执行插入");
}
}
|
1
2
3
4
5
| public class MsgDao {
public void insetData() {
System.out.println("MsgDao:执行插入");
}
}
|
在serivce中引入,这里使用了注解,省去了new的麻烦
1
2
3
4
5
6
7
8
9
10
11
12
13
| public class UserService {
@Resource
private ContentDao contentDao;
@Resource
private MsgDao msgDao;
public void insetData() {
System.out.println("UserService:执行插入");
contentDao.insetData();
msgDao.insetData();
}
}
|
编写测试函数
1
2
3
4
5
6
7
8
| public class UserServiceTest {
@Test
public void insetData() {
ApplicationContext applicationContext = new ClassPathXmlApplicationContext("applicationContext.xml");
UserService userService = (UserService)applicationContext.getBean("userService");
userService.insetData();
}
}
|